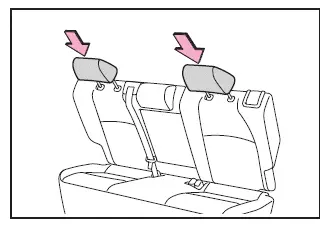
Front seats
In the Subaru Solterra, the front seats are designed for precise adjustment in multiple directions (forward/backward, height, and angle), allowing the driver and passenger to achieve an optimal and ergonomically correct driving position for comfort and safety.
Adjustment procedure
Manual seat (driver and passenger seat)
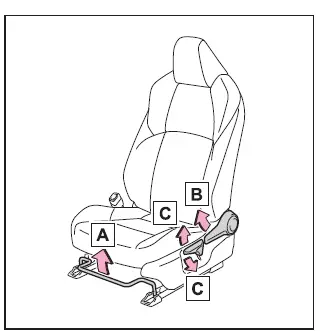
- Seat position adjustment lever (forward/backward movement)
- Seatback angle adjustment lever
- Vertical height adjustment lever
Power seat (if equipped)
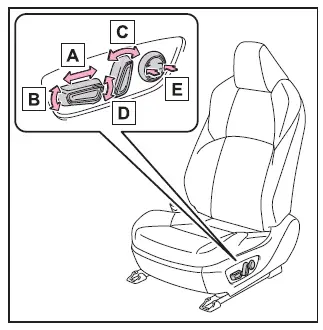
- Seat position adjustment switch
- Seat cushion front angle adjustment switch
- Seatback angle adjustment switch
- Vertical height adjustment switch
- Lumbar support adjustment switch (driver seat only)
These controls in the Subaru Solterra allow fine-tuning of seating posture, helping reduce fatigue and improve driving precision over long distances.
■ When adjusting the seat
- Ensure that no passengers or objects are in contact with the seat before adjusting the Subaru Solterra seat position.
- When raising or tilting the seat, take care that the head restraint does not contact the ceiling or sun visor.
■ Power easy access system (if equipped)
In the Subaru Solterra, the driver’s seat may automatically move depending on the power switch mode and seat belt usage, providing easier entry and exit from the vehicle.
WARNING
■ When adjusting the seat position
- When adjusting seats in the Subaru Solterra, ensure that movement does not cause injury to passengers.
- Keep hands and feet away from moving mechanisms under the seat.
There is a risk of fingers or limbs becoming trapped in the seat components.
- Maintain sufficient clearance for your feet to prevent them from being caught during seat adjustment.
- For manual seats: After adjustment, always confirm that the Subaru Solterra seat is securely locked in place.
■ Seat adjustment
To minimize the risk of sliding under the seat belt in the event of a collision, avoid reclining the Subaru Solterra seat excessively.
If the seat is reclined too far, the lap belt may shift from the pelvis to the abdomen, and the shoulder belt may contact the neck, significantly increasing the risk of serious injury or fatal consequences during an accident.
Never adjust the Subaru Solterra seat while driving, as sudden movement may lead to loss of vehicle control.
Rear seats
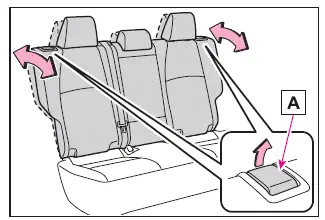
In the Subaru Solterra, rear seatbacks can be reclined or folded using simple lever operations, providing flexibility for passenger comfort and cargo space expansion.
Adjustment procedure
Pull the seatback angle adjustment lever A to adjust the angle of the Subaru Solterra rear seatback.
WARNING
■ When operating the seatback
Follow these precautions when handling the Subaru Solterra rear seats.
Failure to comply may result in serious injury or death.
- Ensure that no passengers are struck by the moving seatback.
- Keep hands and body parts away from hinges and moving components to prevent injury.
- After adjusting, verify that the Subaru Solterra seatback is securely
locked.
If the red indicator is visible, the seat is not properly secured. Ensure the red marking is no longer visible.
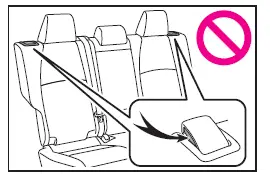
Folding down the rear seatbacks
■ Before folding down the seatbacks
1. Park the Subaru Solterra in a safe and stable location.
Apply the parking brake and shift the gear selector to position P.
2. Adjust the front seat position and backrest angle to ensure there is no interference when folding the rear seat.
3. Lower the head restraint of the rear center seat.
4. Return the rear seat armrest to its original stored position if extended.
This step is not required when folding only one side of the Subaru Solterra rear seat.
■ Folding down the rear seatbacks
Pull the adjustment lever A and fold the Subaru Solterra seatback forward.
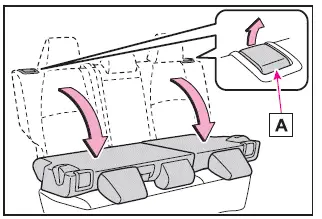
■ Returning the rear seatbacks
To avoid trapping the seat belt, guide it outside the seat belt guide A before returning the Subaru Solterra seatback to its upright position.
Ensure the seatback is firmly locked after returning it to position.
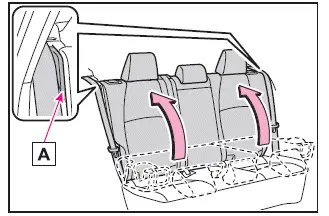
WARNING
■ When folding the rear seatbacks down
Observe the following safety precautions when operating the Subaru Solterra seats.
Failure to do so may result in serious injury or fatal consequences.
- Never fold the Subaru Solterra seatbacks while the vehicle is in motion.
- Ensure the vehicle is stationary on a level surface with the parking brake applied and gear selector in P.
- Do not allow passengers to sit on folded seatbacks or inside the luggage compartment.
- Do not allow children to access or play in the cargo area.
- Do not operate the rear seat if it is occupied.
- Keep hands and feet clear of moving joints and hinges during operation.
- Prevent children from operating the Subaru Solterra seat mechanisms.
■ After returning the rear seatback to the upright position
Always perform the following checks after restoring the Subaru Solterra rear seats.
Failure to do so may result in serious injury in the event of sudden braking or collision.
- Confirm that the seatback is securely locked by gently pushing it forward
and backward.
If the red indicator remains visible, the seat is not properly locked. Ensure it is fully secured before use.
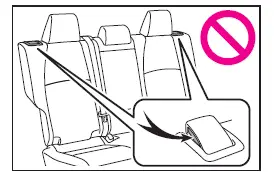
- Verify that all seat belts are properly positioned and not twisted or trapped within the Subaru Solterra seat structure.
Head restraints
In the Subaru Solterra, head restraints are installed on every seat and are engineered to provide crucial support for the head and neck, helping to reduce the risk of injury during sudden braking or collisions.
WARNING
■ Head restraint precautions
Always follow these safety recommendations when using head restraints in the Subaru Solterra.
Ignoring these guidelines may result in serious injury or fatal consequences.
- Use only the head restraints specifically designed for each seat in the Subaru Solterra.
- Ensure the head restraints are always adjusted to the correct height and position.
- After adjustment, press down firmly to confirm that the head restraint is securely locked.
- Never operate the Subaru Solterra without properly installed head restraints.
Vertical adjustment
■ Front seats
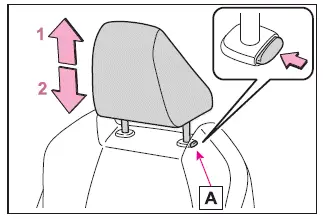
- Up
Raise the head restraint by pulling it upward. - Down
Lower the head restraint by pressing the lock release button A while pushing downward.
■ Rear center seat
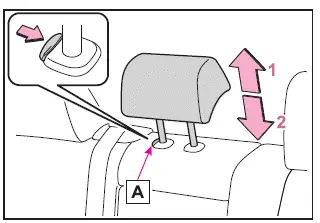
- Up
Pull the head restraint upward. - Down
Press the release button A and push the head restraint downward.
■ Rear outer seats
The head restraints on the Subaru Solterra rear outer seats are fixed and cannot be adjusted.
■ Adjusting the height of the head restraints (front seats)
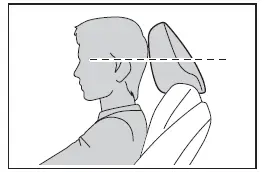
For maximum protection in the Subaru Solterra, adjust the head restraint so that its center aligns with the top of your ears.
■ Adjusting the rear center seat head restraint
When using the rear center seat in the Subaru Solterra, always raise the head restraint at least one step above its fully stowed position.
Removing the head restraints
■ Front seats
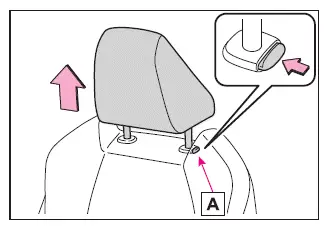
To remove a front head restraint in the Subaru Solterra, pull it upward while pressing the release button A.
If removal is restricted by contact with the roof, adjust the seat height or backrest angle to create additional clearance.
■ Rear center seat
Pull the head restraint upward while pressing the release button A to remove it.
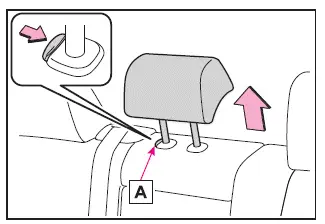
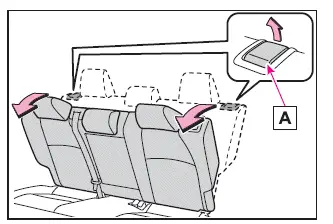
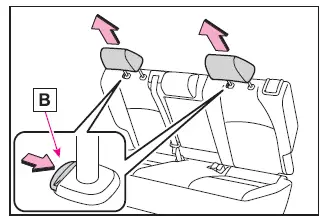
■ Rear outer seats
1. Pull the seatback release lever A and fold the seatback down until the head restraint can be removed safely.
2. Press the release button B and pull the head restraint upward.
Installing the head restraints
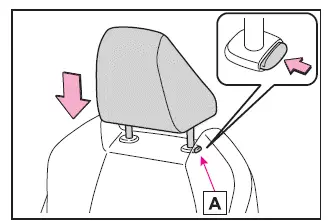
■ Front seats
Align the head restraint posts with the mounting holes and push downward until it locks into position in the Subaru Solterra.
Hold the release button A while lowering the head restraint to adjust its height precisely.
■ Rear center seat
Insert the head restraint into the mounting points and press down until it clicks securely into place.
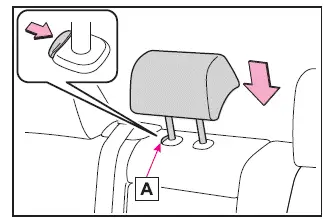
■ Rear outer seats
1. Fold the Subaru Solterra rear seatback down using lever A to access the mounting area.
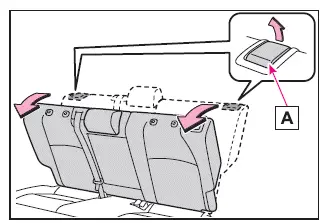
2. Insert the head restraint and push it down firmly until it locks into position.